
The starting lineups:

Heidelberg United fielded the same starting 11 as in their previous games against FC Bulleen Lions and Geelong Galaxy United, with the exception of Lisa Fonua replacing Daniella Galluccio at centre back.
Bayside set up in a 4-3-3, with a pacy front three of Cristina Cardaci, Jess Au, and Emily Harbis looking to stretch the Heidelberg defence.
With both teams playing very mobile forward lines, both teams looked to isolate their quick forwards against the opposition defence by playing early balls for their forwards to run onto.
While Bayside showed a little more variation by occasionally building up through midfield, the temptation for both teams to play long resulted in frequent turnovers of possession and very few clear cut chances in the opening 60 minutes.
Let’s have a look at particular patterns that occurred during the game.
Bayside left space between the lines but Heidelberg didn’t use it.
As a result of the many early passes in behind, the midfield zone became stretched. However, Sidney Allen’s positioning as the number 10 meant Heidelberg found it difficult to build through midfield.
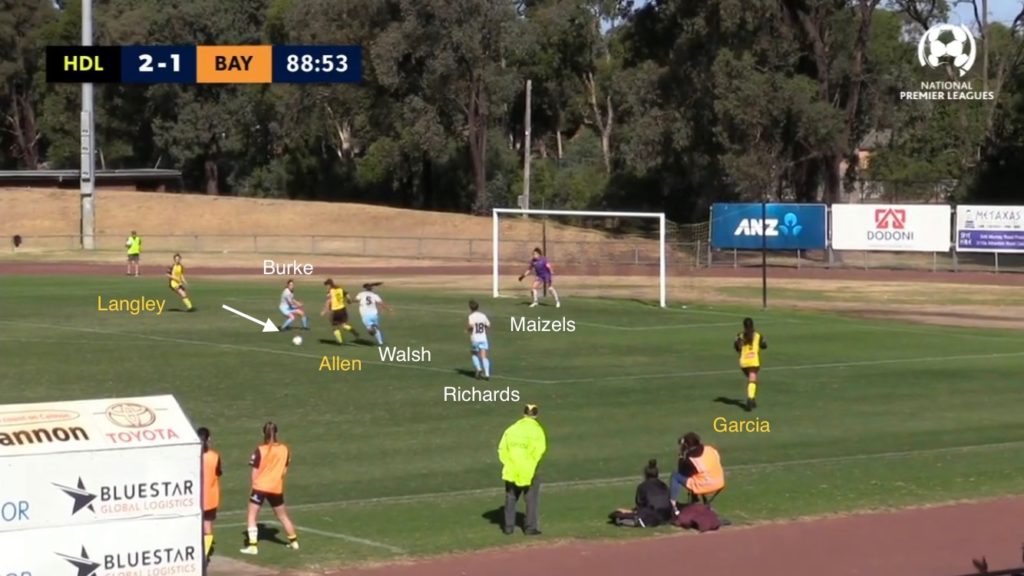
Allen has shown a tendency to move towards the ball in order to get involved. This is sometimes detrimental to the team shape, by drawing markers and consequently closing off better passing lanes. Here, Marie Fonua carries the ball out of defence, and Allen makes a run (yellow arrow) to receive between the lines. Fonua passes to her (black arrow).
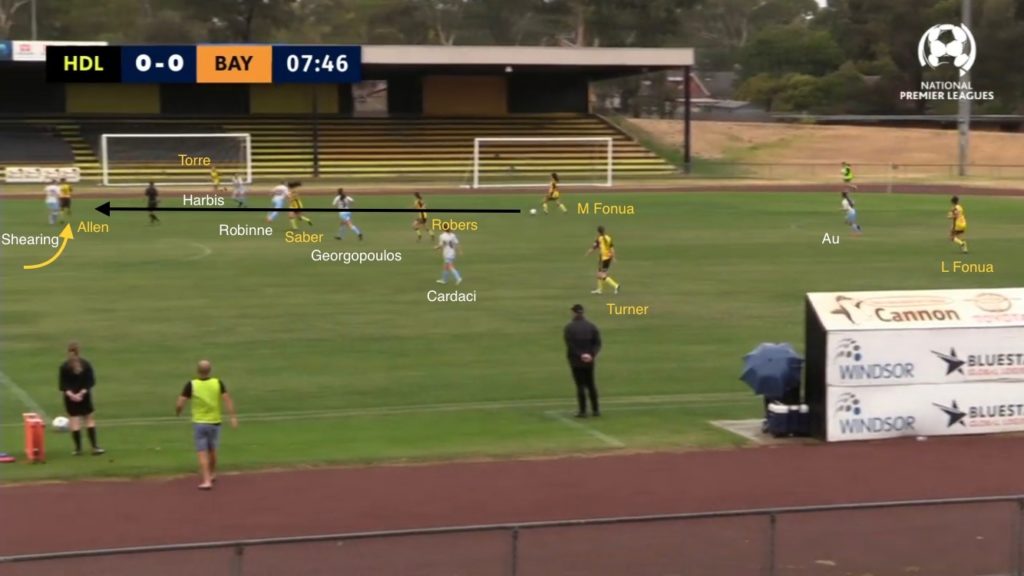
Allen is tightly marked by Kirstie Shearing, who wins the ball.
Consider the alternative. If Allen stayed in her original position (yellow circle), this keeps the passing lane open for Fonua to instead pass to Steph Galea or Holly Boldiston dropping into the huge space between the lines. By dropping in, Galea or Boldiston can create a 2v1 situation with Allen against Shearing between the lines, and potentially set Allen facing forward against a backpedalling Bayside defence.
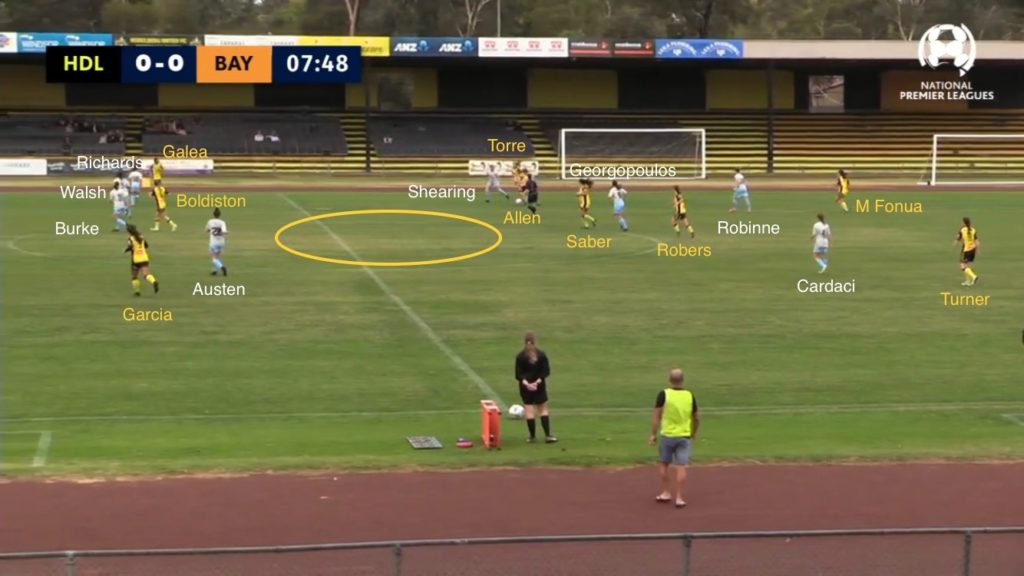
Similarly, in this moment Allen moves wide to assist Galea instead of going for the more dangerous space (yellow circle) and giving Shearing a decision – to go for the ball or track Allen’s run. Instead, by moving wide, Allen makes it easier for Shearing to defend, with the Bayside midfielder pressing Allen against the sideline.

Bayside build-up well but lack the finishing touch
Bayside showed a tendency to attack down their left, with Melissa Maizels preferring to pass to Sarah Walsh when possible and Emily Harbis then coming short (white arrow) to allow Lucy Richards to overlap (blue arrow).
Harbis’ movement had the effect of creating a 4v3 and allowing Bayside an easier central midfield build-up. On the opposite side, Zoe Austen was more conservative in her positioning than Richards, and generally left the attacking duties on the right wing to Cardaci.
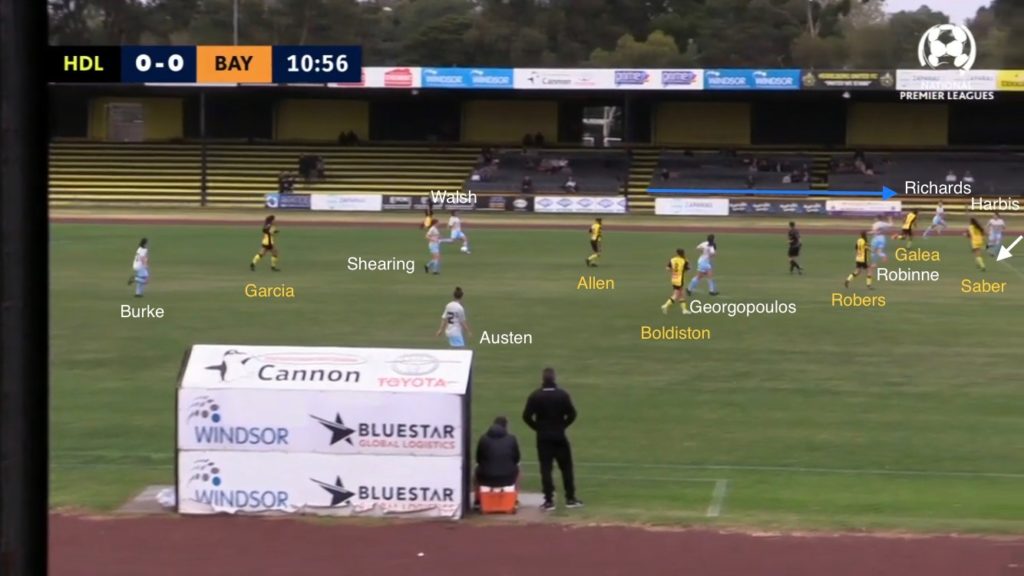
As can be better seen in the image below, Harbis and Richards’ rotation gives Elly Torre a difficult decision. Tracking Harbis short allows Richards to get in behind, whereas leaving Harbis’ run untracked means Harbis is free between the lines to receive a pass. Here, Torre chooses the lesser of two evils and holds her position, allowing her to defend Walsh’s ball in behind for Richards.

While not averse to knocking long balls into the channels for their quick front three to chase, Bayside generally tried to build through midfield, before trying to release Cardaci or Richards on the overlap. The build-up generally was successful, with Margot Robinne having a free role in midfield to find space to receive passes, and using her strength and technique to beat her marker 1v1.
The downside to Robinne playing deep as the creative presence meant that Bayside weren’t able to rely on her finishing ability in the box. Furthermore, if Robinne was marked, this forced Bayside to play long towards Au, who offers speed in behind but not hold-up play. Here, Walsh is pressured by Galea and therefore elects to go long towards Au (offscreen), who loses her duel against the Heidelberg defenders.

Attacking variation brings Heidelberg joy
For a game that lacked meaningful creativity in open play, it was perhaps unsurprising that the opening goals came from mistakes. The first goal in the 62nd minute came from a misplaced Heidelberg backpass, while Bayside conceded the equaliser in the 70th minute by leaving Galea’s rebound and allowing Melissa Garcia to tap in unchallenged.
In the final quarter of the game, Heidelberg started running at the Bayside defence. This change of approach was overdue; for the previous 75 minutes, the Bayside defence were dealing reasonably well with the balls in behind that Heidelberg had been playing. Now having to defend against runners, Bayside’s defenders were drawn out of position.
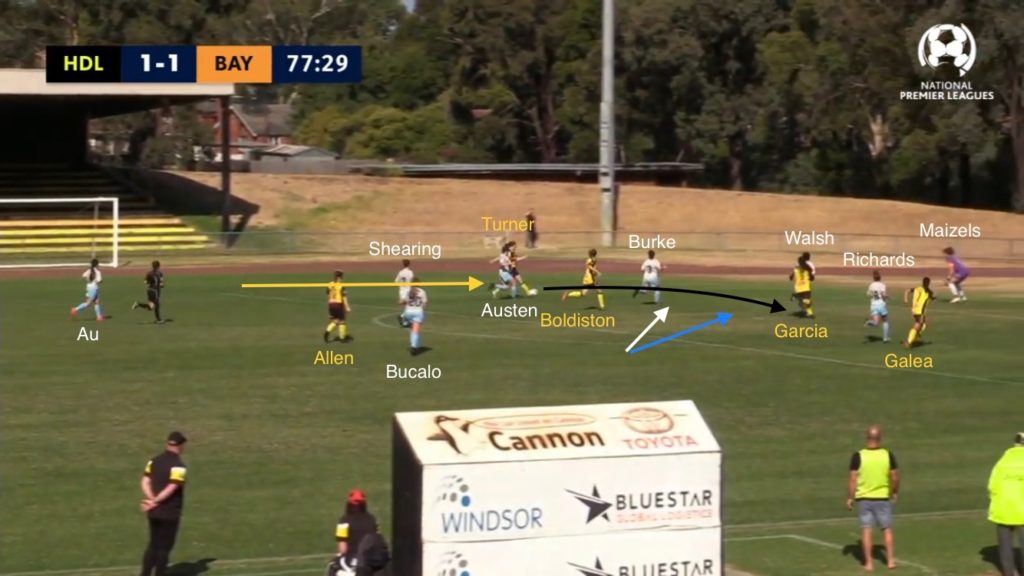
The first image shows the build-up to Heidelberg’s second goal. Ellen Turner receives the ball and drives past Austen (yellow arrow) at speed. This forces Molly Burke to cover her (white arrow) instead of helping Walsh cover Garcia (blue arrow). Garcia is then left 1v1 against Walsh and is able to convert Turner’s low cross.
Shortly after, in the 79th minute, Allen is again in space – she dribbles at speed and plays Galea in. Galea’s cross however has too much on it for Holly Boldiston to reach it at the far post.
The second image shows Heidelberg’s third goal. Allen is able to latch onto a high ball, and runs across the Bayside defensive line who are suddenly having to adjust position. With Burke again being drawn to help Walsh, Emma Langley is left unmarked and is able to finish past Maizels.
Missed the game? Watch the full replay on YouTube on the NPL Victoria channel.
Tune in every week for more independent tactical analysis on NPLW from Chor Lai.